Door Lever Lock Child Proof: Keeping Toddlers Out of Off-Limits Rooms

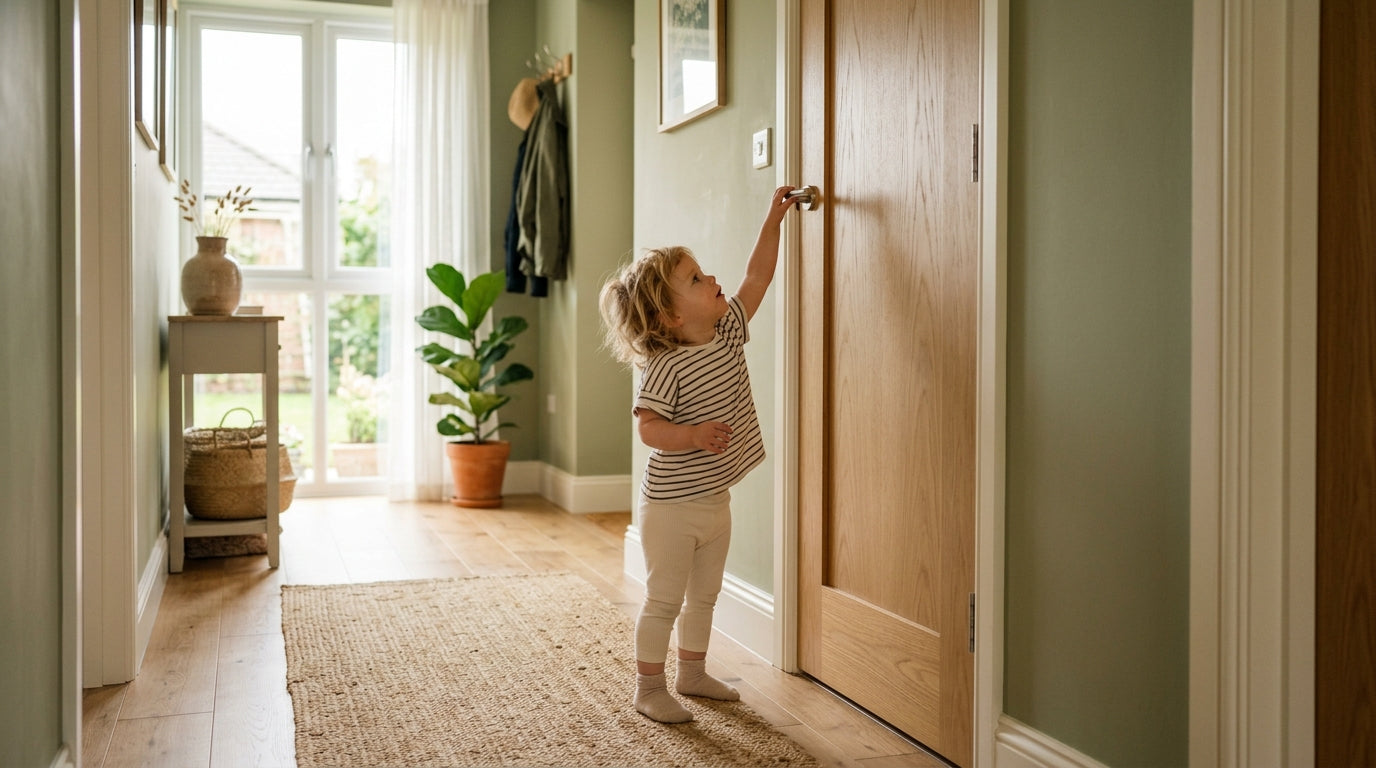
Most modern homes have lever-style door handles. Most child safety products were designed for round knobs. That mismatch leaves a gap that a determined toddler will find, usually on the door you least want them opening.
Why Lever Handles Are a Different Problem
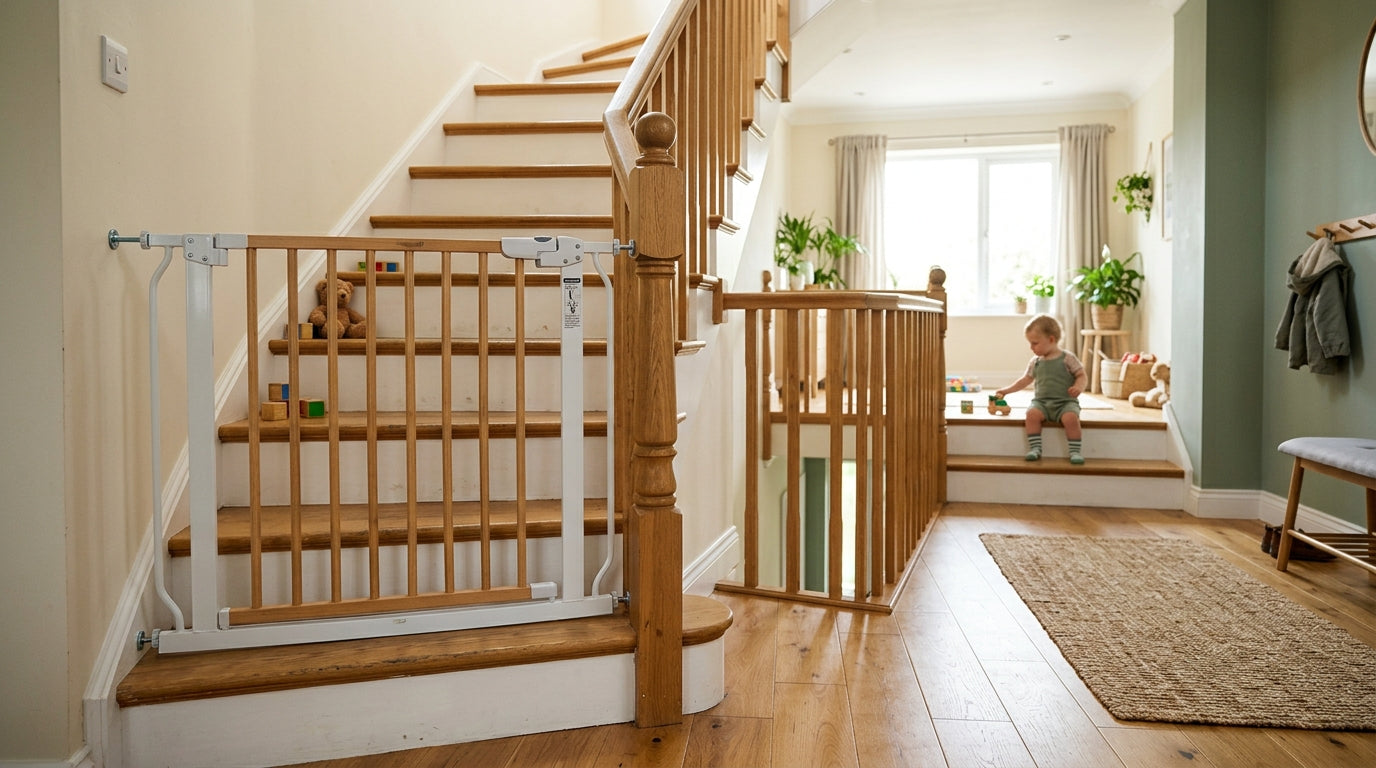
Round doorknob covers work by making the knob too wide and slippery to grip. A toddler can’t generate the torque to turn it. Lever handles require none of that. A child who can barely walk can lean on a lever, press it down with a palm, or hang off it with their full body weight. The mechanism rewards exactly the kind of clumsy, full-body effort that toddlers specialize in.
My older daughter figured out our bedroom lever at 22 months. She wasn’t trying to escape. She just wanted to follow me. But the bathroom was two doors down, and once she knew how levers worked, every door in the house became a project.
This is why lever-specific locks exist, and why they matter for rooms that hold real hazards.
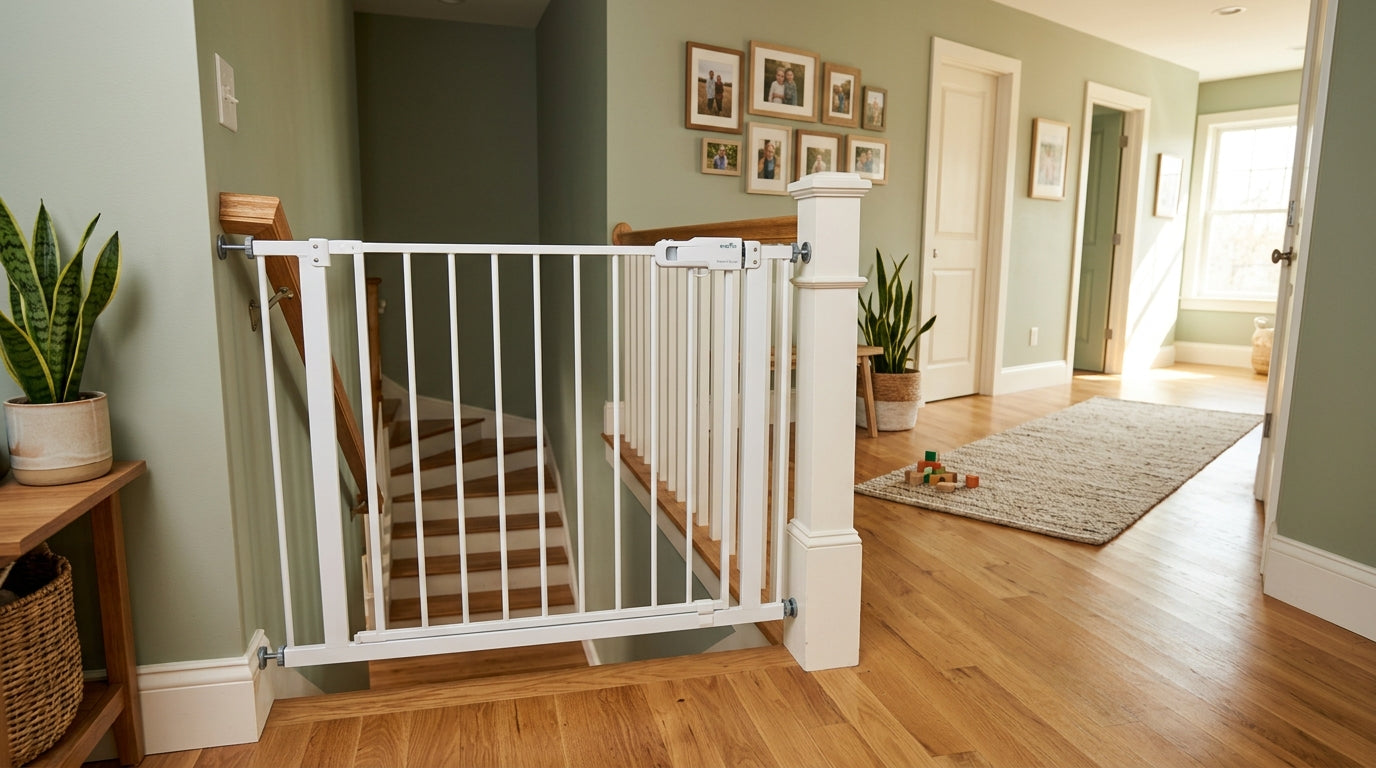
The Rooms That Need Locks
The CPSC recommends securing doors to bathrooms, kitchens, laundry rooms, and garages because those spaces concentrate the substances and equipment most likely to injure a toddler. Drowning, poisoning, and burns are the risks. The window between a distraction and a disaster is shorter than most parents expect.
The numbers behind this are worth sitting with. America’s Poison Centers reported more than 87,000 cases of children under 6 exposed to household cleaning products in 2024, the single largest substance category for that age group. Nearly all of it was accidental. In 2024, 99.2% of poison center cases involving children under 6 were unintentional, according to America’s Poison Centers. These aren’t children making bad decisions. They’re children doing exactly what toddlers do: opening things, tasting things, exploring.
Per CDC PROTECT data, unsupervised medication exposures send roughly 100 children under five to U.S. emergency departments every day. Medications stored in bathroom cabinets, nightstands, or kitchen drawers are a primary source. A lever lock on the bathroom door is one more barrier between a toddler and whatever is under the sink or in the medicine cabinet.


Three Types of Lever Locks and How They Differ
Adhesive-mounted covers slip over the entire lever and attach to the door with adhesive strips, usually 3M Command-style or similar. To open the door, an adult squeezes or slides the cover to release it. A toddler pressing down on the lever just presses on the cover instead, which doesn’t move the lever underneath. These are the easiest to install and the easiest to remove without damaging paint or finish, which matters if you rent.
Latch-based blockers use a physical arm or bracket that physically prevents the lever from depressing past a set point. They typically require a screw mount or strong adhesive anchor. More secure than covers, harder to install, and not always compatible with every lever geometry.
Combination-button locks require an adult to press one or more buttons simultaneously while operating the lever. The cognitive and fine motor demand is beyond most toddlers under three. The trade-off is speed. In an emergency, fumbling with a multi-step lock on a bathroom door is a real consideration. Know your household’s layout before committing to this type on every door.
-
Wipe the lever with rubbing alcohol and let it dry fully. Remove all oils and residue.
-
Peel the adhesive backing and press the cover firmly onto the lever for 30 seconds.
-
Wait the full cure time listed on the package before testing, usually 24–72 hours.
-
Apply firm downward pressure to the lever. If the cover shifts at all, remount or replace.
-
Test monthly. Replace immediately if the lock feels looser or easier to depress than when new.
Installation: Where Most Parents Go Wrong
The lock is only as good as its attachment. I’ve installed six lever covers across two homes, and the one that failed on me failed because I skipped the surface prep step. The adhesive looked fine. It held for three weeks. Then my younger daughter leaned on the door hard enough to shear the cover sideways, and the lever depressed underneath it.
For adhesive-mounted locks, clean the lever thoroughly with rubbing alcohol and let it dry before application. Oils from hands, cleaning sprays, and even manufacturing residue will prevent a full bond. On textured, painted, or worn metal levers, adhesive may never bond reliably. In those cases, a latch-based or screw-mount option is worth the extra installation effort.
After installation, test the lock under firm downward pressure before you rely on it. Press the lever hard. Try to slide or pry the cover. If it shifts at all, remount it or choose a different product. A lock that moves under pressure is not a barrier.
If you’re buying a product, look for compliance with ASTM F3492–21, the voluntary consumer safety standard for child-safety cabinet locks and latches. Locks meeting that standard must withstand an average breaking force of at least 45.3 lbs across a 30-sample test. That’s not a federal mandate, but it’s a meaningful benchmark. Products that don’t reference any standard at all are worth scrutinizing more carefully.
Matching the Lock to Your Specific Hardware
Not all levers are the same. Lever angle, handle length, rose plate size, and door thickness all affect fit. A lock designed for a standard 3-inch residential lever may not seat correctly on a longer commercial-style handle or an angled European-style lever.
Before purchasing, measure your lever length and note the angle. Most product pages list compatible lever dimensions. If yours is unusual, check the manufacturer’s compatibility guide or contact support. Buying the wrong size and forcing it to fit is how you end up with a lock that looks installed but isn’t secure.
Exterior doors add another variable. Most lever locks are designed for interior doors with standard residential hardware. If you’re trying to secure a door to an attached garage, which is one of the highest-hazard spaces in any home, verify the lock is rated for that door type and handle weight.
Lever Locks and Door Slam Stoppers Are Not the Same Thing
These two products get confused in search results and on store shelves, and they solve different problems. A door slam stopper limits how far a door can close, protecting little fingers from being pinched in the gap. A lever lock prevents a door from being opened.
According to NEISS data from 1999–2008, roughly 4 in 10 pediatric door-injury emergency department visits happen to children age 4 or younger. Pinching is the leading mechanism, accounting for 54.8% of cases. When a door injury is severe enough to require hospitalization, amputation is the single most common diagnosis.
Those numbers argue for both products in homes with toddlers. A slam stopper on the bathroom door protects fingers. A lever lock on the same door keeps a toddler from opening it in the first place. They work together, not as alternatives.
Testing, Wear, and When to Replace
Lever locks on frequently used doors take real wear. Adhesive degrades with temperature swings. Plastic components crack under repeated stress. Mechanical parts collect grime and become sticky or loose.
Test every lever lock at least monthly. Apply firm downward pressure. Check that the cover or blocker hasn’t shifted, cracked, or become easier to depress. If the lock feels different than it did when new, replace it. A lock that’s 80% functional is not a safety device.
This is especially important in kitchens and bathrooms where cleaning sprays, steam, and temperature changes are constant. The same conditions that degrade adhesive on cabinet latches affect door locks.
Lever Lock Installation Checklist
Locks Are One Layer, Not the Whole System
A lever lock on the bathroom door buys you time. It doesn’t replace supervision, and it doesn’t replace storing hazardous items out of reach or in locked cabinets. Under the federal Poison Prevention Packaging regulation (16 CFR Part 1700), specific household chemicals and medications must arrive in child-resistant packages, but child-resistant is not child-proof, and a toddler who reaches a product has already bypassed the packaging requirement.
The practical model is layered: lever lock on the door, locked cabinet for medications and cleaners inside the room, and supervision as the active layer over all of it. Each layer covers for the others when one fails.
My younger daughter once emptied the under-sink cabinet in the time it took me to answer the doorbell. The cabinet lock had failed. She didn’t get into anything dangerous because I’d moved the cleaning supplies to a higher cabinet months earlier. That’s the redundancy you’re building toward.
Teaching Alongside the Hardware
Lever locks are rated for toddlers ages 12–36 months. By age three or four, many children will watch you operate a combination lock and start experimenting. Hardware buys you time to teach.
Use that time. Explain which doors are off-limits and why, in simple terms. "That room has things that can hurt you, so we keep it closed" is enough for a three-year-old. Pair the boundary with a consistent response every time they test it. The lock enforces the rule while you’re not watching. The conversation builds the habit that outlasts the lock.
When your child is reliably respecting the boundary and has the motor control to operate the lock safely, you can remove it. Most adhesive-based lever locks are designed for damage-free removal, which matters for painted doors and rented spaces. The goal was never a permanent fixture. It was a bridge through the highest-risk years, and it worked.