Hardware Mount vs Pressure Mount Baby Gate: The Definitive Comparison

About 93,000 children under 5 are treated in U.S. emergency rooms each year for stair-related injuries, according to a Nationwide Children’s Hospital analysis of CPSC NEISS data. That’s roughly one child every six minutes. A baby gate is the most direct intervention between your child and those stairs, and the choice between hardware-mounted and pressure-mounted isn’t a matter of preference. It’s a matter of where the gate goes and what’s at stake if it fails.
Most parents buy one type, install it everywhere, and find out the hard way that the wrong gate in the wrong location is worse than a false sense of security. I’ve been there. When my older daughter was 14 months old, I had a pressure-mounted gate at the top of our stairs for exactly three weeks before my husband pointed out that I’d made a serious mistake. We replaced it the same weekend.
Here’s what you need to know.
How Each Mount Type Works
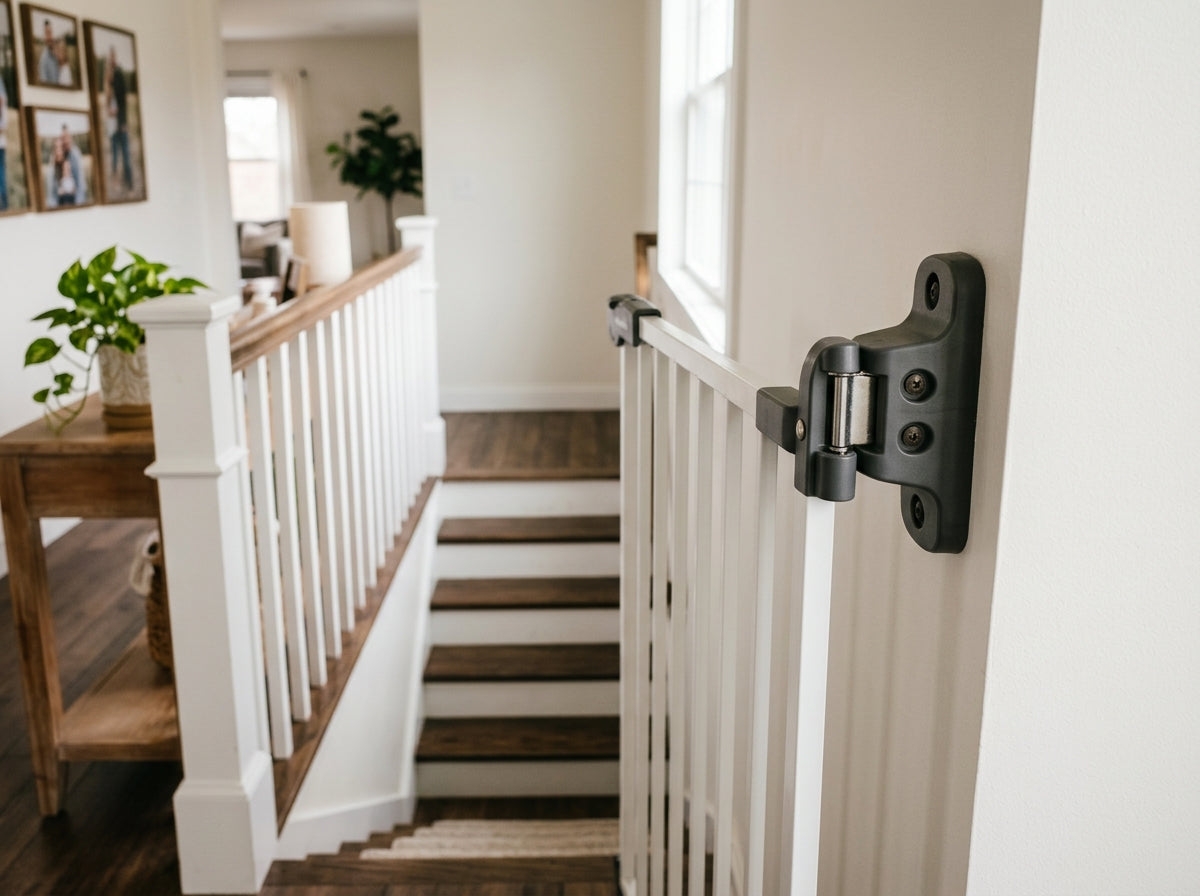
Hardware-mounted gates attach directly to wall studs or solid door frame material using screws and mounting brackets. The gate swings on hinges, latches when closed, and cannot be moved without tools. The connection is structural. When a 28-pound toddler throws herself at it repeatedly, which mine did, the gate transfers that force into the wall framing rather than into the floor.
Pressure-mounted gates use a tension system. Rubber-tipped bars press outward against both sides of an opening, and friction holds the gate in place. No screws, no holes, no studs required. An adult can remove the gate in seconds by releasing the tension. A determined toddler can sometimes do the same, especially as the gate ages and the rubber compresses.
The mechanical difference matters because the failure modes are different. A hardware gate fails at the latch or the hinge, which you can see and repair. A pressure gate fails at the friction interface, which can happen gradually and invisibly as surfaces compress or walls flex.
Where Each Type Belongs
ASTM F1004 is the federal safety standard for expansion gates and expandable enclosures, made mandatory under 16 CFR Part 1239 (effective 2021). That standard sets how gates are built, tested and labeled; it does not dictate where you install one, but the CPSC’s guidance is blunt: “For the top of stairs, only use gates that screw to the wall.”
The reasoning is straightforward. At the top of a stairway, a gate failure means a fall down the entire flight. The CPSC’s position is consistent: pressure-mounted gates are suitable for room-to-room separation on flat surfaces, not for stairway protection. If you’re containing a toddler between the living room and the kitchen, a pressure gate is fine. If you’re standing between your child and a 12-step drop, it isn’t.
Hardware-mounted gates belong at the top of stairs, at the bottom of stairs in homes where a child could climb and then fall backward, in front of fireplaces, and blocking access to any room where an unsupervised minute could cause serious harm. Pressure-mounted gates belong in lower-stakes positions: a pantry opening, a hallway between rooms, a temporary barrier in a play space.


Installation: What You’re Getting Into
Pressure gate installation takes 5–10 minutes. You expand the gate to fit the opening, tighten the tension knobs, and you’re done. No tools, no measuring for studs, no drilling. This makes pressure gates the obvious choice for renters who can’t put holes in walls, for temporary barriers during travel or visits to grandparents’ homes, and for parents who need a gate up immediately.
Hardware gate installation is a different project. Budget 30–45 minutes, and have a drill, a stud finder, a level, and the right bit for your wall material. You’ll need to locate studs or solid framing on both sides of the opening, which is straightforward in standard door frames but can be complicated in wide openings, archways, or walls with unusual stud spacing. The mounting brackets that come with most gates are designed for standard 28–42 inch openings. Wider openings require extension panels, which add cost and sometimes require additional wall anchors.
When I installed the hardware gate at the top of our stairs, I hit a stud on one side and drywall on the other. I spent 20 minutes relocating the bracket position before I got solid purchase on both sides. It’s not difficult work, but it requires patience and the right tools. Rushing it produces a gate that wobbles, and a wobbling hardware gate is almost as bad as no gate.
| Feature | Hardware Mount | Pressure Mount |
|---|---|---|
| Top-of-stair use | Recommended by CPSC | Never (CPSC guidance) |
| Installation time | 30–45 minutes | 5–10 minutes |
| Tools required | Drill, stud finder, level | None |
| Renter-friendly | No, leaves wall holes | Yes, no damage |
| Typical lifespan | 5+ years | 2–3 years |
| Surface compatibility | Works on most surfaces | Smooth, plumb only |
| Cost (upfront) | Higher (20–40% more) | Lower |
| Long-term cost | Lower, single purchase | Higher, repeat replacement |
| JPMA certification | Available | Available |
The Real Cost Comparison
Hardware-mounted gates typically run 20–40% more than comparable pressure-mounted models. That gap is real, but it’s not the whole cost picture.
Pressure gates rely on rubber compression to maintain tension. Over time, that rubber deforms. The gate that felt solid at installation may show visible looseness by the end of year two. Many parents replace pressure gates every 2–3 years as tension weakens, particularly in high-traffic openings where the gate is being moved multiple times a day. A pressure gate at $60 replaced twice is $120. A hardware gate at $90 installed once and used through two children is $90.
The hidden cost of hardware gates runs the other direction: wall repair. When you remove a hardware gate, you leave behind screw holes and, depending on the bracket design, some surface damage around the anchor points. Spackling and repainting is a minor project in a home you own. In a rental, it can mean deposit deductions. This is a legitimate consideration, not a trivial one, and it’s worth factoring into your decision before you drill.
Surface and Opening Compatibility
Pressure gates have real limitations that the packaging doesn’t always make obvious.
They require smooth, parallel surfaces. Textured walls, brick, rough plaster, or glossy painted surfaces reduce friction significantly. A gate that feels secure on a smooth-painted drywall opening can slide and shift on a textured or semi-gloss surface. Angled door frames, rounded archways, and openings that aren’t perfectly plumb create uneven contact that compromises the tension hold.
I learned this when I tried to use a pressure gate in a doorway at my in-laws’ house. The frame had a slight angle, maybe 3 degrees off plumb, and the gate shifted every time someone walked through it. We ended up not using it for that visit.
Before buying a pressure gate, check the opening: Is it plumb? Is the surface smooth? Is the paint finish matte or satin rather than high-gloss? If the answer to any of those is no, a pressure gate may not hold reliably in that location.
Hardware gates accommodate more variation. Extension panels handle wider or irregular openings, and the screw-in brackets don’t depend on friction at all. For older homes with non-standard doorway widths or irregular framing, hardware mounts are often the only option that installs securely.
Everyday Use and Traffic Flow
This is where pressure gates have a real advantage that’s easy to underestimate.
A pressure gate can be stepped over or removed entirely without unlatching. In a kitchen where you’re moving in and out every few minutes while cooking, that matters. Hardware gates require deliberate unlatching, which is usually a two-step process designed to prevent toddler operation. That’s the point. But it also means every adult pass-through requires a conscious action.
If your hardware gate is in a primary exit path, think through emergency egress before you install it. A gate that requires two deliberate hand motions to open in the dark, while carrying a child, is a different obstacle than it seems in daylight with both hands free.
Pets and older siblings add another variable. A larger dog can push a pressure gate open by leaning into it, particularly as the gate ages. An older child who has watched adults operate the gate will figure out the tension release faster than you expect. Hardware gates with self-closing hinges and dual-action latches resist both of these. My older daughter defeated an adhesive strap lock at 26 months. She has not defeated the hardware gate at the top of our stairs, which has a top-mounted latch she can’t reach and a swing mechanism that requires lifting before pushing.
Pre-Purchase Checklist
The Case for Using Both
The most effective approach isn’t choosing one type. It’s using each where it performs best.
Hardware mounts go on the stairs, full stop. They also belong in front of any room where unsupervised access creates serious risk: a home office with cords, a laundry room with chemicals, a garage door. Pressure mounts handle secondary containment: the kitchen during cooking, a play area boundary, a temporary barrier during a home project.
This layered approach means no single gate failure creates a path to a high-risk area. If the pressure gate in the kitchen gets pushed open by the dog, the child is in the living room, not at the top of the stairs. Redundancy in child safety is almost always worth the cost.
What to Check Before You Buy
A few practical checks before purchase:
- For pressure gates: Measure the opening width (standard range is 28–42 inches without extensions), check wall surface texture and paint finish, confirm the frame is plumb, and verify the gate is not going anywhere near stairs.
- For hardware gates: Locate studs or solid framing on both sides of the opening before ordering. Know your wall material. Confirm the gate swing direction works for your space; at the top of stairs, the gate must never swing out over the steps. If the opening is wider than 42 inches, price out the extension panels before you commit to a model.
- For both: Check that the gate carries JPMA certification, which indicates it has been independently tested against ASTM F1004. The JPMA certification mark is the fastest way to confirm a gate has met the federal standard, not just the manufacturer’s claims.
The gate you choose matters less than installing the right type in the right location. A certified hardware gate at the top of your stairs, properly anchored into studs, is one of the highest-value safety investments in your home. A pressure gate doing the same job is a liability, regardless of how solid it feels on day one.